SEE: Yard Control Buttons
SEE: Tree Control Buttons

|
Blinking
|
These are manual blinking controls not to be confused with the Light-O-Rama interface. You can make a channel of lights blink. There are 4 blink styles and 7 speeds.
NOTE: You must activate a controller or channel before you can make lights blink. To turn off blinking, highlight the channel you want to change and click the "Off" section of the Speed dial. 
|
|
|
Power
|
You can click on the main power button on the design controls section to turn off all lights, decorations and 3D lights in your project.
Click again to turn the lights back on. |
|
|
Season
|
Toggle between winter and normal
|
|
|
Music
|
Click the music button to display the music controls and select a song.
|
|
|
Snow
|
Click on the Snowflake Button to see the snow options menu.
|
|
|
Record
|
Click to created an animated gif image recording of your project.
|
|
|
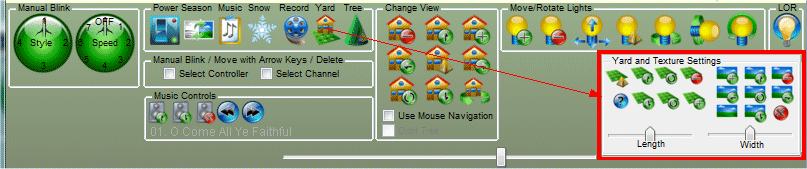
Yard
|
Use the yard button to toggle showing the yard controls and hiding them.
More information can be found here: The Yard Controls |
|
|
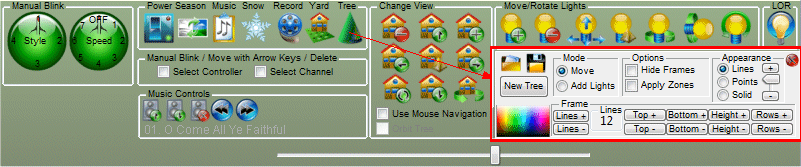
Tree
|
Use the tree button(if available) to toggle showing and hiding the tree controls. More information can be found here: Tree Control Buttons
|
|
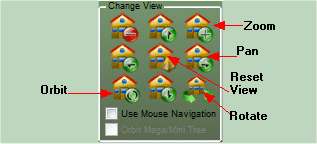
Change View
|
Use the change view controls to adjust the viewing angle and perspective of your design. Zoom, Pan, Rotate and Orbit are available. The sliders are a quick way to change the view. The slider automatically takes on the function of the last view button you use. The default is "Zoom".
The mouse can be used to change the view. Hold down the "space bar" or click on the "Use mouse navigation" button to change the view with the mouse. |
|
|
|
|
|
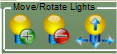
Move Lights
|
Use these controls to move lights or decorations in all directions.
|

|
Rotate Lights
|
Use the rotate buttons to rotate lights or decorations in all directions. The |
|
|
Light-O-Rama
|
If available, the Light-O-Rama button opens up a data port on your computer to connect to the Light-O-Rama sequencing software.
|
|
Music Controls
|
Turn music on/off. Stop music. Next and previous track.
|
|
|
Activate
|
You can activate an entire controller or a specific channel. Once activated the controller or channel can me moved using the arrow keys or mouse wheel. You can also delete or invoke manual blinking sequences to an active controller or channel.
Click on the check boxes and the current assigned controller or channel will activate and appear green. Current: |
|
|
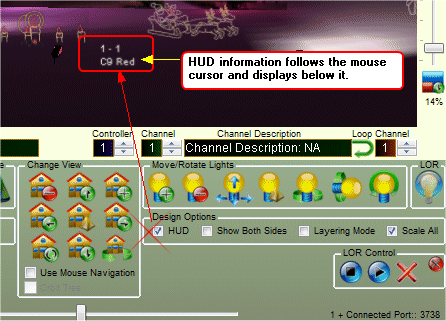
Design Options:
Heads Up Display |
Use the Heads Up Display or "HUD" to remind you of the current Light Controller and Channel selection:
|
|
|
Design Options:
Show Both Sides |
Check the "Show Both Sides" box to render both the front and back side of lights and decorations. It requires more memory and processing to show both sides. This option is not necessary if you are only viewing your design from the front.
|
|
|
Design Options:
Layering mode |
Use layering mode when you need to add lights to a point in the design where a light or decoration already exists. This option tells the program you don't want to move the lights under the mouse but rather add new lights on top of what is already there.
|
|
|
Design Options:
Scale All |
The scale all option tells the program to scale every light and decoration together when using the scale slider. Turn this option off if you need to scale things independently.
|
|
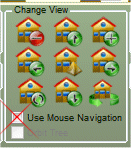
Mouse Navigation
|
Click this box if you want to zoom and pan the camera by moving the mouse cursor around the edges of the design. You can also activate this by holding down the space bar. Use the mouse wheel to roll the camera.
|
|
|
|
|